Showing posts with label projects. Show all posts

Sunday, May 24, 2015

Redneck Engineering Saturday

They say that necessity is the mother if invention. That is often how our redneck engineering has come to pass. We live in Southern Arizona, so there is a lot of sandy soil, and very little grass. Therefore we bring in hay and feed, and grow fresh in container gardens in the pens. The problem is that when we clean pens, a lot of dirt gets shoveled out with the poop, and the ground level in the pens has slowly but steadily lead to lower ground in the goat pens. The chicken areas have easily had their holes filled over time, but the goats aren't so easy. We have tried several "scoop" solutions over the years, with this being our last incarnation...


Yep- hardware cloth over a horse pooper scooper, because the pellets would go right through otherwise. The problem with the scoop was you had to largely shake the scoop to get the dirt out, and that was another cloud of dust and allergy issues to deal with. So with Bailey getting ready to leave for summer, and kidding season almost upon us, Bailey and I sat at morning milking with a topic on our minds looking for something better. What else to do but raid the scrap pile?

There was a piece of hardware cloth (that stuff is awesome) used as a temporary fix on a fence panel that Wyatt and I are due to fix before that temp pen gets used again. So we didn't need it anymore, and procured it. Then to the woodpile. These boards seemed like a nice start. There were too more that size, but they would not work due to the size of the hardware cloth.  So Bailey headed off to the power tools.


She was a little concerned at one point about the edges and wood, but this isn't staying in the pen, only being used for muck. We are good with this. Here is how the "tool" came out.


Here it is in use. My milking doe, Mama Lulu wanted to help. Or be quality control. Or just be cuddled along the way, you never quite know with her!


This area of the pen- the doe barn has long been the worst. Which is awful, since their food is here! As we began shoveling large amounts of loose dirt out to get the poop, we confirmed just how low the dirt would go, and decided to add a concrete brick under each end of the hay feeder to bring a little stability and give us an idea where the level was when we finished.


Mama Lulu loves to ham it up for the camera, and started playing peekaboo from behind the hay feeder.


When we run the dirt throuh, the dirt falls down and leaves us with poop on top of the mesh. Then we dump the mesh into the muck wagon. If I had it to do over, one end would have a larger spot than this for the muck to run down to make it less messy dumping. Live and learn. But we did much better at leaving the dirt in the pen.


Here we are, part way done, with Versie checking things out.


They also liked to walk wherever we just cleaned and leave us more work to do!


Silver and Glory wanted to get in on the action. They wanted to help spread out the piles of dirt. Too bad they didn't want to carry them back to the doe barn!


Lulu saw the camera, had to scratch her chin as the sun was goig down behind her.


Goofy girl!


Here we were almost done. We will never get every single piece of poop and leave the dirt behind, but this worked much better! Score one for the Patriot's Dream girls and a little Saturday ingenuity!


The does ended up wanting two yellow "ribbons" to decorate for memorial day. I offered them their red white and blue ones from the shed, but they liked these from their hay bales and the yellow that even though we pay our respects this weekend to those who made the ultimate sacrifice for our country, we don't forget those presently with boots on the ground while we are here at home.


Wyatt has decided he is going to show pygmy goats as well next year. He always said that he would as soon as they let him show bucks, which they won't, but he rather likes little McAllie. So Bailey taught him to trim hooves last night.


Well, that made for a productive day for us, even if we did want to get more done. What redneck engineering have you tried? Care to share with us?


Wednesday, January 14, 2015

The Shower Project, Day One

This is my big project for the semester break. A long time in the making

Over ten years ago (I am thinking more like twelve...), we renovated our bedroom and bathroom. We hired a handyman to come out, put up drywall and completely redo the bathroom. Among several little mishaps, the shower never was quite right.  We had to take it out immediately and fix plumbing. We tried to maintain as much of what had been done as possible. It turns out that was a mistake.

All of this time later, I had been fighting with caulking that would not stay adhered for more than a few months along the base. The walls weren't holding up to my constant interventions, so last year I purchased an entirely new shower to put in. I was going to do it while Charlie was away for hunting season, but he never managed to stay gone for very long at any of the times, so it went on the list for my break between semesters! Therefore, yesterday I got busy tearing the old one out!


As of last night, the walls from the shower came out, the handles are off,  The handles are a bit of a funny story, somehow the decorative housing was filled with caulking when we re-put it up all those years ago. I won't say how that happened, but it was the most difficult part of the tear down to this point! I also discovered that only about one inch at the bottom of the wall board was concrete backer board, the rest was green board. The concrete board had apparently gotten wet early on, and had just been degrading all of this time, hence the caulk wasn't staying adhered due to moisture behind the shower wall.


I pulled that stuff out and threw it away, then cleaned up after myself for the night. Wednesday, around my to do list for the day, I will be pulling out that green board tot he ceiling, then removing the pan. Charlie will pick up the backer board on his way home from work, since it will not fit in my little car! The scariest part for me will be removing the pan, as I want to preserve all of the tile if I can and only redo the grout at the edge of the shower pan (keep your fingers crossed for me on that one, please, will you? That part is the scariest for me!)


At the end of the night, I tidied up as best I could and put a tarp over the walls. Hopefully, the next update will look far different and have good news! Have you ever done one like this? Any input for me on the project?

Wednesday, December 31, 2014

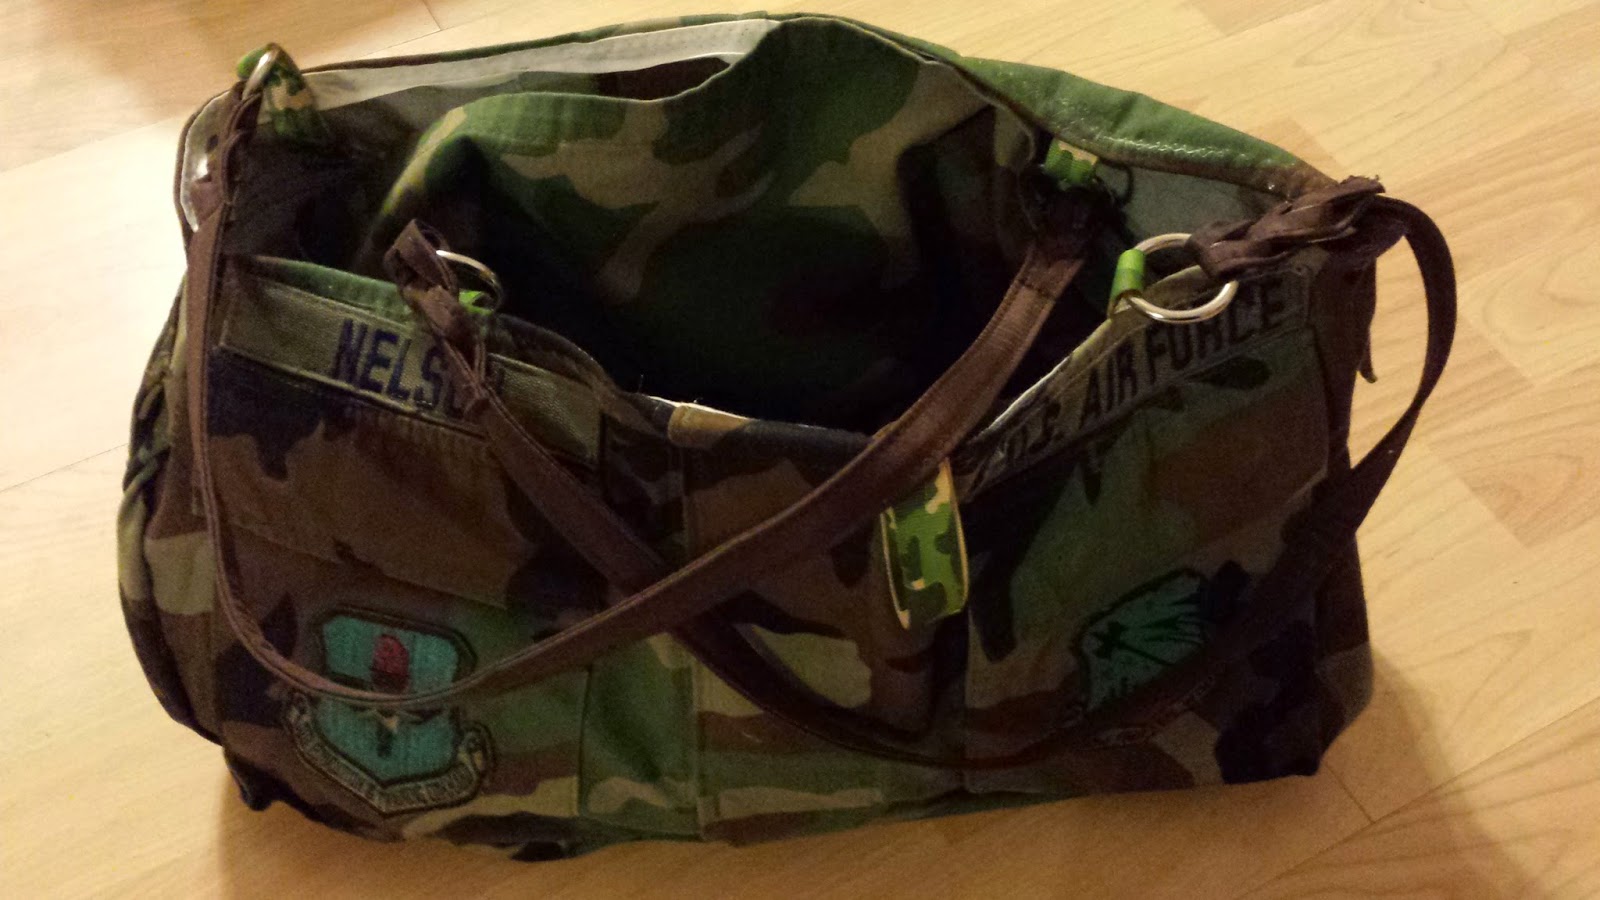
My New Purse

I have been needing a new purse.  But being who I am,  I carry a good bit of stuff with me most days.  Things like batteries for the aerobics microphone and a water bottle and lots of little things like that, to help me attempt to keep up with this crazy life. 


A couple of years ago,  Charlie's unit switched to the new style of BDUs.  When he could no longer wear the style he had worn when I first met him,  I asked Charlie to pack the old uniforms away for future projects, and just in case the kids wanted them.  And I rather thought this project would come along. 

I made a similar purse for my niece last year, and about a month ago, I asked Charlie to sit out a few sets for me to work on some projects with.  As I began to cut this out, We made a few camouflage stockings, and Wyatt even learned to use the sewing machine while making one. 


As luck would have it, the uniform which would become my new purse was one of his favorites, sporting some random paint for character. The outside reveals four pockets,  including two with unit insignia. The inside has six, formed from material from the jacket back and arm, just for fun. 
So here is the finished product, complete with handles found on after Christmas sale at the fabric store!


Here it is,  almost completely loaded,  and with room to spare! Next up? Making one specifically designed for and by Bailey.  AND this next one will have goat patches,  too!  Stay tuned for that design,  coming soon!  Though for now, this edition got Charlie's seal of approval,  telling me that it looked good enough to make for sale. 


It is pretty exciting when he likes my work! But for now, I will be doing most of my work on a by request basis, so that my time is focused on what matters. So I have to ask, if you could design your own purse, what fabric would you choose, and what features would you want?

Monday, October 6, 2014

Up-cycled Projects for Sustainable Farming

This dresser was yellow was it came to Arizona before our daughter was born. It had lived through my family, having been well constructed, though over the years it began to have troubles. We reassembled the drawers, reattached the bottoms, reattached the faces and back corners, over and over and over again. That is,  until this Spring, when I just couldn't get it to go back together again.

I thought hard about how to re-purpose it, rather than give up on something that seemed to still have life in it. I considered adding board for shelves, but realistically, I could see that causing a TON of dusting, without really adding much convenience. I considered the shelves and using the drawer faces like flip up doors, but when I got into the actual design on that idea, it really didn't work. Nothing would fit right.

I poured over Pinterest. That's what I tell the 4H-ers to do.

So it sat on the back porch, waiting for my crazy over attached to tradition self until I finally just realized- the greatest need around here was the organic and sustainability projects. So a plan was hatched- this dresser would be phase one- of the livestock salad bars.


Salad bard for livestock. you ask? Why yes. By creating planters where the sprouts continue to grow, proving more greenery to the chickens and goats, we hope to supplement their organic nutrition with things more naturally eaten in the wild. Besides, what we grow ourselves, when know where it comes from, and it is more economical for feeding organic.


So we took this old dresser, and the kids and I got to work.


The main frame of the dresser went to the doe pen. Sorry, it was getting a bit dark.


Wyatt took the first of the drawers with no base out to the Big Pen.


He picked a spot where the chickens keep digging hols for him to fill (two birds, so to speak.) Not far from the waters, though. We won't water it with chicken water, but we do want to make watering pretty easy!


They filled them mostly full with garden soil from my re-potting pile. They left a bit of room at the top, so the animals would not have enough leverage or grasp to pull the plants out from the root. Then came chicken wire.

I had originally thought to use hardware cloth to keep the from pulling too much, and had been following the progress of a few similar projects. It turns out, at least one person was having trouble with hens getting stuck walking on the hardware cloth and losing toes. Who! I hadn't even though of that! Glad for someone else's honesty and experience. Hope those hens are getting around okay!


This one is outside the doe barn. Once we catch the water harvesting system up, we plan to have one there, too, and stationed this so that there was just enough room by the roof, but against the wall, for a water harvesting barrel, and this could easily be watered from it. She added plenty of seeds that had been soaking for a couple days.


Then she got to watering them two to three times each day.


This is what is coming up. I have some more for her to reseed later tonight.


This is the chicken one in the Big Pen. Too bad I didn't get a photo of this one earlier, since they are REALLY digging on their sprouts! Wyatt will be adding more seeds, but just because they weren't as established as we had thought they would be when the ladies began eating them. They like to work together to get the best grasp on the sprouted grains while one stands on the wire, the other puts her head through to munch!


It is doing quite well, but we will continue to work with it!


Next up, after reseeding? The Bucks and the A Pen! The more natural the food is, the better!!!


Saturday, September 27, 2014

A Little Teamwork and Homegrown Redneck Engineering...

One of the many fun things I never expected about adulthood is that there is always a project awaiting my attention. I wish that was an exaggeration, but it isn't. Back in the spring, we got a crack in the wall of the shower in the master bath. I consulted friends, and came up with a plan to help it wait until hunting season. Why, you might ask? First off, in the last year, there have been several family crises in our extended family, and family is more important to us than tearing out an entire shower when we can avoid it.

Why hunting season? Really, out of practicality. Four of us live in this house, and when one or two are off hunting, fewer people are trying to share a shower and bathroom! So when Charlie was away on his archery elk hunt, I needed to make use of my time. 

First, Wyatt had been finishing repairing a hole in his bathroom from where the towel bar, not having lined up on the studs, had left a hole in the wall. It wasn't the first time, but the new repair was actually much better than the first, and he had done all of the work. We agreed that repainting the bathroom was a good idea, since the walls and ceiling are scrubbed regularly, and having to paint the repair meant a good time to do it all. Then we decided to go a shade darker.

The original color was an icy blue on one main wall, with the other walls white. We went just a smidgen more vibrant with a still icy blue, and took the blue back over the shower as well.


I think the color is a little more accurate in the top photo. Now we need to decide on new rug and curtain for the shower. Any thoughts for us?


I wanted to think that after that, and two coats of paint of course, that I was ready to get going on the master shower. But then I realized that something really did look funny. The vanity, to be specific. The drawers had kept rolling out and hitting me in the knee while I had been painting, but it didn't dawn on me right away (I do projects like this late at night, so I am even slower than usual during these times.)

Anyway, something look a little off to you? The front of the vanity had separated from the frame along this side. Ugh. I had no desire to replace it, but needed to get things on track so I could move on to the next project!


Wyatt helped me bring in a floor jack, and I was hoping to use some liquid nails to put it back together. After dragging it all the way up to the porch, and us using a dog towel to preserve the wood floor while lining it up in the bathroom, it didn't fit under the kick plate, so it had to go back out. My friend, Janna, gave us the idea of a soup can and board. Wyatt didn't want any proof of being involved in this redneck engineering...


He was able to help me with a piece of wood flooring and a can of canned pumpkin, but then the board broke- darn...


So then we were back at it with wood and a glass jar we usually use for tea.


The jar was too big, but we went back to the can of pumpkin. Less scary in terms of possible broken glass anyway, right? I thought I had everything on track at about this time, and used lots of glue to secure it in place. Wyatt continued to hold it down until I brought in some little weight plates. I thought for sure we were on track then, but it was not to be.


In the morning, after waking the kids the first time, I released the board, and found that the glue did not hold at all. BIG UGH! But I put the weight plates back in place, and having realized that there was some space between the drawer tracks and the original frame board that I could not screw to because of all the trim on the front, I brought in an extra piece of wood to fit there, and ran screws. It wouldn't be pretty, but when the drawers were closed, the screws would at least be hidden behind the drawer faces,


I went with long screws, since the board would have to support the weight of the drawers as well, and sone of them didn't go in all the way, so I will cut those off. But in the end, it is functional now, and will hold for quite a while so that I can get on to the  next project.  
perfect? No. But functional? Yes.


Anyhow, outside of the issue there, the vanity is perfectly functional, and I have really become frustrated with the "throwaway" nature of society these days, so I am going to repair and reuse wherever I can! We might not be fancy, but we are working to practice and live what we preach- organically, environmentally, and in an many aspects of our life as possible.

Well, lots more projects going on to share with you in the coming weeks. We hope you will also share your projects with us to continue to inspire and help others use a little redneck engineering in their homesteading and home projects!  And if you have a better solution tot he projects we have done, please share that, too! 

Have a truly blessed and thankful day!

Tuesday, August 12, 2014

"White" Wicker Chair Project

I don't know about your house, but at our house, there is just never enough seating in the living room! I have long had a desire for a fun little wicker chair, though had no desire to spend much money on one since we have so many animals and animals don't tend to be good to the wicker. 

Nevertheless, when I found a black wicker chair for free on Craigslist, the wheels were turning. When I realized that I would be right down the street from where the free chair was located the following day, I couldn't resist!


Black, however, isn't really my thing. And while brown would likely have matched the living room better, there is just something in me about wicker being white to look its best. So out came the spray paint. I should have gotten a photo of the original color, but here is my project anyway =)... already in progress...


Slowly but surely moving toward its new look, and showing off the weeds by the back retaining wall at the same time!


You can see more of the original color as I was working underneath.


Overall, the project took a few days and a little over two cans of paint.


Here it is, coming along...


starting to look as though it was meant to be white all along...


And here it is with the cushion I bought for less than $10 at a thrift store and worked to make sure was clean before putting it on the chair. 


Our living room has lots of green with lots of animals- mostly elk and deer, and the like, but puppies fit in beautifully!


It took a bit for it to settle in, but my new chair that I thought would have no competition for me has also become a favorite of Wyatt!


All in all, I am pretty happy with the way my new twenty some dollar chair came out. What do you think?